Instant Terra

Unreal Engine plugin

First steps

Prerequisites

Instant Terra
Instant Terra 2.2.3 or Instant Terra Pro 2.2.3, or any newer version, must be installed on the computer.

Unreal Engine
Unreal Engine 4.26, 4.27, or 5.0  must be installed.

Installing the plugin

Get the plugin from Unreal Engine marketplace.

Enabling the plugin

If you have installed the plugin for a specific project, it will be enabled automatically.

Otherwise, launch the Unreal Engine editor.
Click on Edit > Plugins.

The Plugins window opens with the new Instant Terra plugin.

Instant Terra Unreal Engine plugin

Check Enabled. The following message is displayed: 

Click Restart Now.

Creating an Instant Terra project in Unreal Engine

Initializing the terrain in Unreal Engine

Start by creating a terrain in Unreal. To do so, open the Modes menu and select Landscape mode.

UE mode

Define your settings in the New Landscape panel on the left and click Create.

create project

Linking to Instant Terra

To edit an Unreal Engine terrain with Instant Terra, an Instant Terra project has to be linked to this terrain from Unreal Engine.

To do so, select the terrain actor (named Landscape by default) from the World Outliner window, and right-click to open its contextual menu:

The contextual menu shows a Create Instant Terra project entry.

menu

Click on Create Instant Terra project.
A new actor named InstantTerraProject is displayed in the window:

Instant Terra is automatically launched and opens a default project

Edit in Instant Terra

Editing the terrain in Instant Terra

The graph is made of three parts.

The Terrain size group

First group: Terrain size

use in Unreal

The Unreal Size node is used to define the terrain size with values that are compatible with Unreal Engine.

The project is initialized using the size of the Landscape created in Unreal (505 x 505 by default).

The size information (Width, Height and Quad size) calculated from the Unreal Size node is used by a Preset node. This preset can be easily used in the entire graph to guarantee the consistency of the terrain size.

Warning: If the size of the output terrain is different from the size in the Unreal Size node, the terrain is not sent to Unreal Engine and an error message is displayed.

Groups for designing your terrain

By default, this part contains four groups of several nodes: Base terrain, Erosions, Colorize, and Masks.

You can change or replace all these groups and nodes with your own ones to design your terrain. They are only included here to help you get started.

Note: If you are using generator nodes (noises, primitives, etc.) it is better to control their sizes using the Preset node defined in the Terrain size group to ensure compatibility with Unreal Engine.

"Send to Unreal" group

This group contains a single node used to send your terrain and layers to Unreal Engine:

Send to Unreal
Define layers

Exporting masks to Unreal

Instant Terra can generate numerous masks, such as the Flow map, a Snow mask, a Slope mask, etc.
You can export those masks and use them in Unreal.

Adding layers

In the Use in Unreal node’s properties, add a layer:

The node has an additional mask input connector.

This connector is mandatory: you must connect a mask to validate the node (or use the X button to remove the layer and the related input connector).

Masks settings

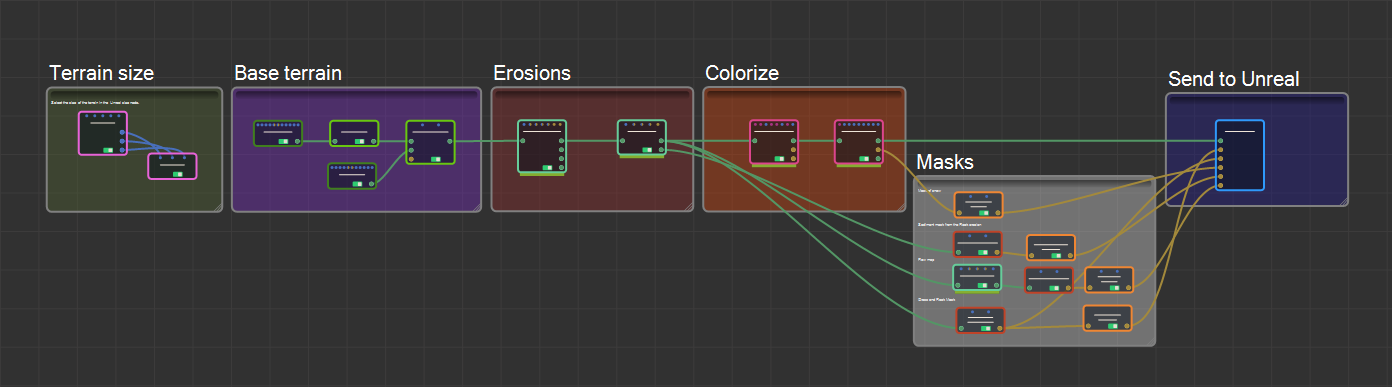
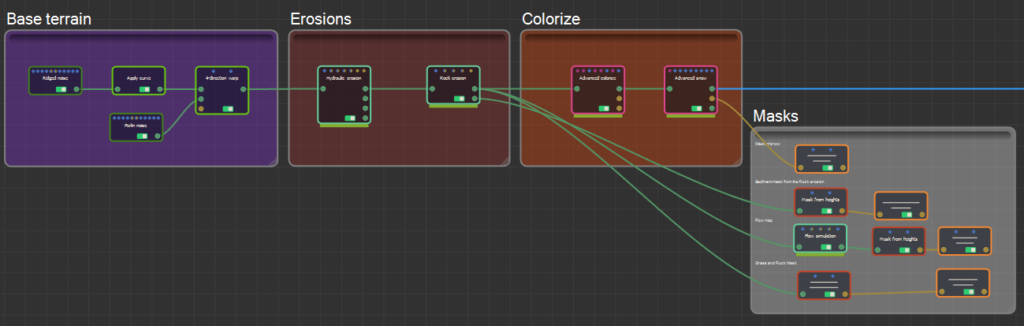
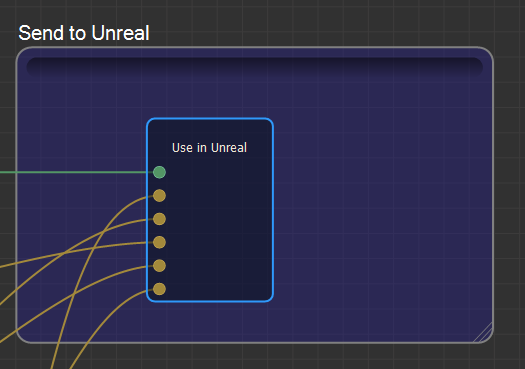
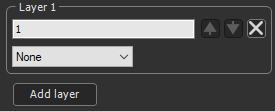
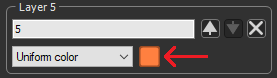
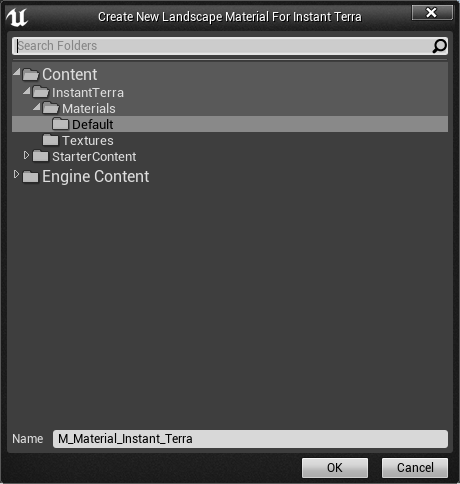
Each mask connected to the Use in Unreal node corresponds to a Layer in Unreal. For each mask, you can specify a name and a texture type.

Names: The names are used in Unreal for different items such as the Layer Infos or the Landscape Layer Blend node’s name.

Texture type: You can assign a texture type to each layer. These details will be used by the Landscape Material in Unreal.
There are five types of textures:

None
Uniform Color
Grass
Rock
Snow

No texture is assigned in Unreal Engine
A simple color is used as the texture
A grass texture is used
A rock texture is used
A snow texture is used

If you select Uniform Color, click the colored square on the right to assign a color.

The Grass, Rock, and Snow textures are provided with the plugin and they are free to use.

If you use them, a window opens in Unreal Engine when the terrain is sent, to select the folder to store the different Assets.

Using the masks in Unreal Engine

These masks are used in the Unreal terrain’s Layers (the one you can see when in Landscape mode then in Paint).
These Layers are used in the shader displaying the terrain.

Sending the terrain to Unreal

In Instant Terra, select the Use in Unreal node and click on Send to Unreal.
Each time you click on the Send to Unreal button, the terrain is automatically updated in Unreal Engine.

Creating and updating Landscape Material

By default, the plugin creates a new Landscape Material in Unreal and assigns it to the Landscape, if it does not already have one.
Otherwise, it is updated each time the terrain is sent from Instant Terra. Unreal lets you select the folder to save it when it is created.

You can disable this behavior (if you are satisfied with the current Material or if you want to use your own Materials) by deselecting the Update Landscape Material check box.

Warning: If this check box is selected, the Unreal Material assigned to your Landscape will be updated and possibly deleted.

Tip: if you don’t want to create a Landscape Material from scratch, check the Update Landscape Material checkbox to let Instant Terra create a new Landscape Material. Later if you want to customize this Landscape Material, uncheck the checkbox. Instant Terra won’t update the Landscape Material anymore and you can modify it to fit your needs.

Saving

To save the Instant Terra project linked to the Unreal project, save the Unreal project by selecting File > Save current or File > Save all in Unreal Engine. The Instant Terra project will be saved first and then the Unreal project.

Importing an existing Instant Terra project

To import an existing Instant Terra project into Unreal, first launch Unreal Engine and Instant Terra as described above, and open your Instant Terra project.

If this Instant Terra project has not been created through the plugin, you are prompted to import it into Unreal Engine.

The specific nodes needed to import the project to Unreal Engine are added to the project.

Before:

After:

Now, you can update any generator node to use the Unreal Preset size, and link to the Use in Unreal node the output terrain and the masks that you want to send to Unreal.

Working with several layers

If the Enable Edit Layers checkbox is checked, Instant Terra will only modify the first Layer of the Landscape, which is the Layer at the bottom of the list of Edit Layers.
You can modify the other Edit Layers to modify the terrain on top of the terrain created with Instant Terra.
It’s also possible to send a terrain created in Instant Terra to an Edit Layer, change the Layer order, and then send another terrain to another Layer.

Where to report feedback?

Any feedback, issues, wishlist, questions: please use our forum here.

See also...

-->